Visualizzazione post con etichetta period dress. Mostra tutti i post

domenica 26 febbraio 2017

19th century cotton chemisette

Last Christmas I have been gifted (squee!) with a full series of Regency patterns created by Jeannie of Sense & Sensibility. I came across their website ages ago, when looking for Titanic tea gowns patterns. At that time I didn't sew yet (we're talking about more than 10 years ago!) so I didn't pay too much attention to the full series of patterns they offered but - recently -  I changed my perspective. Usually I try to draft most of my patterns to save money and assure me a great fit (I have a weird body shape with small bust and very wide hips so not every commercial pattern fits me) but since I sew mostly for others, I rarely have the time to drape a customized pattern for myself. So, yeah, sometimes I choose the easiest way using a premade pattern. 
My boyfriend made me the best present ever, purchasing for me a whole series of Regency patterns: this collection includes undergarments, several dresses, purses, embroidery patterns and spencers. Oh my god. You cannot imagine how happy I was, my hands were absolutely scratching while looking at the pattern pieces. I HAD to try them asap! However, I had a very difficult January fighting against a bad ribs inflammation so I couldn't sew or cutting without feeling huge pain: this situation translated in a temporary closed shop on Etsy and a period of relax. I felt kinda down (being self-employed if I don't work I don't get paid...) and during one of these afternoon I decided to challenge my pain sewing a very small piece from these patterns: a chemisette! 

The Regency undergarments pattern includes two chemisettes, one with ruffled collar and another one with a pointed collar. I decided to make the first one with a flat ruffle. I used some sheer cotton I had in my stash plus some satin ribbon to close it. That's all. I made it all by hand excluded the shoulder seams, made by machine with a french seams.


A general overview with the dress on.

The chemisette came together really quickly, it was extremely easy to put together and it took me just a couple of days to be finished. In a normal health status I would have finished it in a day. I decided to avoid buttons or pins so I left the two part of the chemisette open, because there's enough overlap on the front to keep it closed when worn. 

This item is available on my Etsy shop in different standard sizes!  


martedì 20 settembre 2016

A Regency day in Osasco: dress and undergarments

If you followed me for a while, you may know I'm kinda new to 18th century and Regency costuming. Being definitely not what you can consider a tall lady, I've never been a huge fan of high waistlines and raised breasts because I considered them bad looking on me. I was wrong. Really wrong. My perception of Regency era simply mislead by movies, period dramas and lack of knowledge. Being honest and admit your limits is the first step to open your eyes and start studying seriously a certain historical period and fashion. 

Period dramas and so on forced the public to think Regency fashion was something delicate, extremely feminine and with a great freedom of movement given by the lack of corsets, heavy undergarments and underpinnings such as panniers or pocket hoops. Many ladies I know who sewn a Regency dress think the same but this is partially true. Regency women WORE corsets, even if they were surely more comfortable and less constrictive than their predecessors. They wore several layers too, such as chemises, petticoats, chemisettes and so on. 
So, after making my own and serious researches I radically changed my point of view about Regency costuming; those dresses looked bad on me because of the lack of proper undergarments. That's all. You don't need to be tall to look good in your historical outfit.

After all these considerations, I can (finally) tell you something more about my first Regency event. Two months ago (ok, I'm a little bit late!) I was invited by Le vie del tempo to join one of their events at Osasco castle; I didn't have an early 19th century wardrobe so I had to sew or purchase everything. I mean...everything. The only thing I had was a pair of flat shoes. Sounds great, uh?

I started with a bodiced petticoat. Since we were at the end of July I decided to skip the chemise to survive the italian summer heat (I failed) and I drafted the pattern for my bodiced petticoat in a while; it's a basic top with a gathered skirt at the underbust with hooks and eyes at the back. I used some cotton in my stash and I sewn the hems with a basic running stitch. The garment when together easily and without surprises. Phew!! 
Then the corset or - better - the short stays. They're made of two layers of cotton with plastic boning and metal grommets, not accurate but I was out of time and on a budget. I drafted my own pattern and since I'm not busty I avoided the gussets. 

Bodiced petticoat with pinned stays

Now the fun part - the dress! I originally planned to make a blue cotton dress but the cotton I had was too heavy to be worn at the end of July (and still is...) so I run to the fabric store to look for a lighter fabric. I ended to buy the same fabric of my Ancient Roman green tunic with some extra satin piping for the back seams. 
Ta-dah!

I wanted a drawstring dress but my bodice wasn't big enough to be gathered; after consulting Historical Sewing again about Regency dresses closures, I went for buttons at the back. I put piping at side back seams and between puff and lover sleeve but adding it to the neckline has been a mistake. The neckline became too heavy and large for my bust and needed to be filled with a fichu. 


I don't have nothing new to say about the construction; the dress is made of a 5 pieces bodice and a two pieces skirt partially gathered. That's all. For a fuller skirt, just add another panel and you're done. 
I have larger biceps than an average woman of my size so I wanted to hide them with long sleeves. A mistake, again. But they were really nice. 

Here you can see how the gathers look. I love how the piping came out! 


The ladies from the group especially loved the braided hairstyle my boyfriend made me that morning. 


Indeed he really did a great job! 

Some photos from the event:


giovedì 20 novembre 2014

XVIII century costume: Marquise

Hello ladies! Today I wanna show my last creation, a rococo' inspired costume :3
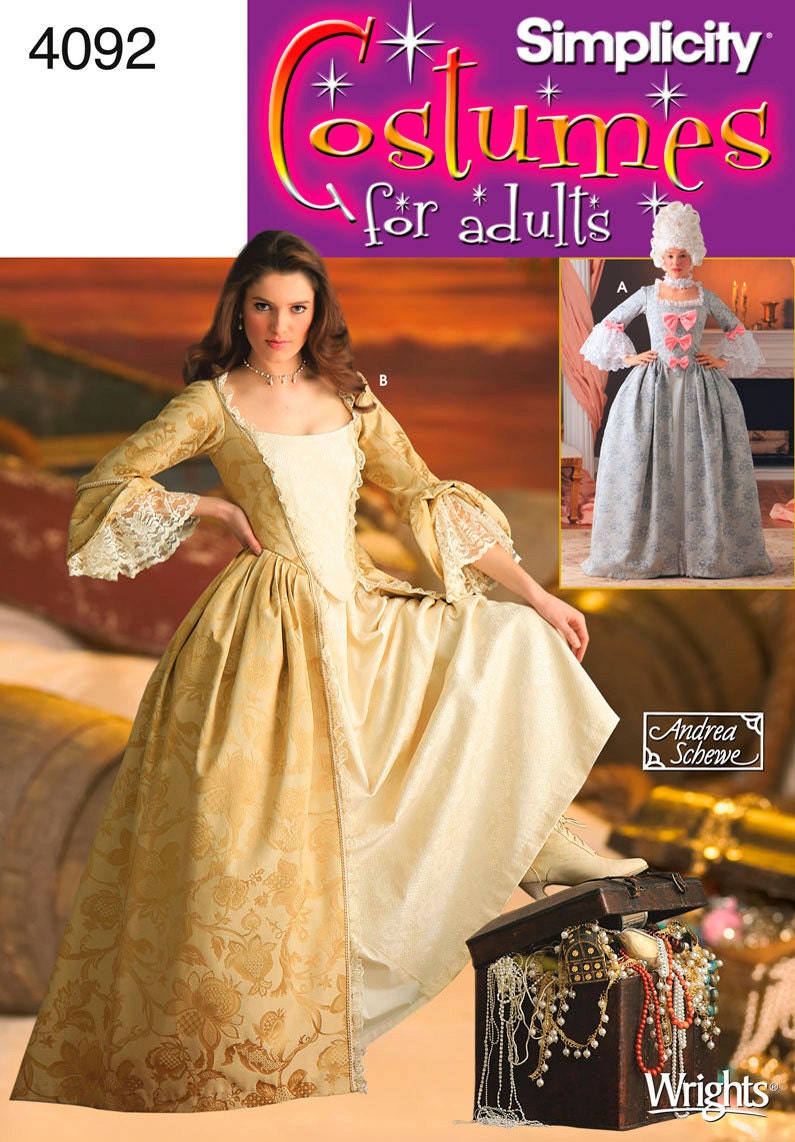
The XVIII century was one of the few historical periods I never met in my modelling life. I've never been a huge fan of panniers and high hairstyles, powder and wigs, but as a beginner costumer I wanna try everything. I found a good offer on Ebay for a Simplicity pattern (number 4092) and I bought it. While doing some research about the pattern on the web I discovered it was released in 2006 when "Pirates of Caribbean" came out; the first model shown on the envelope is a classic XVIII century gown with lace sleeves and decorative ribbons (a simpler version of a robe à la française) while the second one was inspired by the movie itself, and looked easier to make. 


The reviews described the pattern as very good for beginners and I've to admit they were right. I had some problems with the panniers but I'm not good with heapieces and accessories. This dress was the first fully lined and boned costume I ever made and I'm soooo pleased with it! I finished to sew it in a couple of weeks and I would recommend this pattern to every lady who wants to start a rococo' inspired dress. 

The fabrics I chose are midnight blue taffeta and light blue satin. The dress asked for a petticoat but I chose to sew the underskirt and the main dress together (this is not historical accurate). On the back I went for a pair of hidden buttons instead of the zip asked by the pattern. The bodice has been really easy to sew together and I was a little bit frightened by the boning part. I was wrong! My boyfriend helped me to draw the boning channels and I did the rest, using linen as interfacing (so I have 4 layers in my bodice: fabric, lining, linen and lining again). The result is sooo lovely, the central panel falls perfectly and gives a good shape. I used spiral steel boning for this project and since the dress fits me quite fitted (I used a size 8 instead of a 10, the pattern runs large) I avoided to add extra boning except the central panel. 
The second step has been the lining. Lot of love! The dress falls on the body like a feather and the inside of the garment looks so professional. 


After sewing the lining to the bodice I stitched by hand this beautiful blue organza trim along the whole neckline. 


Then I started to decorate the bodice attaching the sleeves and this beautiful ivory lace. 


The skirt has been very easy to sew; I pleated it instead of gathering it and I'm so satisfied of the result. This is how the dress looks without the panniers: 


I started sewing the panniers in a second moment, when I saw the dress looked so "empty" without a proper underpinning. The problem with the panniers is the back: the dress doesn't hang straight on my hips (it's obvious, this model wasn't designed for panniers) and so the back looks quite big. For the panniers I bought two metres of natural/ivory linen and white bias tape as boning channels: 


These are the several layers of the dress. I use a burgundy taffeta petticoat to hide everything. 


.  My bf took some detailed photos with his Reflex to show you some details:


That's the dress in action during a shooting: 


For this dress I spent less then 100€: the fabric costed around 60€, the lace was really cheap and I already had at home the blue satin ribbons I wear around the elbows. The choker has been done by my own, it was an old strip of black lace hidden in my sewing basket from ages. And you? Did you sew a Georgian dress as well? Show me your work! 

lunedì 20 ottobre 2014

My Bliaut inspired dress (XII-XIII century)

Hello there!
Today I'm here to talk you about one of my last sewing projects. I was a reenactor years ago and I 've always been in love with the medieval dress for excellence, the Norman "bliaut". It's the typical, feminine, medieval dress with long sleeves and V neckline, the fitted waist and the flattering skirt. This model was very popular during Norman period in Europe, around XI and XII century. 
I never had enough money to buy a good bliaut so I chose to sew one by my own. It's not accurate (as my other costumes) 'cause good historical dresses need lot of money I don't have at the moment. I try to do the best I can with my own resources. 
For my bliaut I used about 4 mt of burgundy linen and 6 mt of embroidered trim. The pattern has been designed by myself, using an old medieval dress which I bought online years ago as reference (very similar to the historical model). I did some variations: my original dress has lacing on the back and I substituted it with a more accurate side lacing with hand-sewn round eyelets. The result is more or less this one (see photo below).
I'm not a great fan of linen (especially if it's not soft) and I try to avoid it every time I can. A good bliaut can be sewn in silk as well for a very noble look but I wanted to give to linen another chance and so I bought it. I found the woven trim at a local market for a very cheap and affordable price. 

After cutting the fabric I pinned both sides and sleeves obtaining this result: 

 photo IMG_20140824_231843_zpsdb29b792.png

 photo IMG_20140825_124645_zps4ed661f1.png


The dress was too tight on the hips for my tastes and so I added the side lacing to adjust it (I'd like to thank my friend Cristiano for his precious suggestion about side lacing! - he saved this project). The solution was simply perfect and the dress fitted me perfectly. So I started adding the trim on sleeves, neckline and hem. I had enough trim enough for a belt too.

 photo IMG_20140828_194310_zps4528cbe6.png

 photo IMG_20140826_165418_zps2cb91c5f.png

Some photos of the finished dress: 


I love, love how it turned out! The sleeves could be more fitted and the skirt wider, but I don't care. I'm planning a matching veil for a more accurate look. 


venerdì 8 agosto 2014

Tudor court dress pt.2

So, after working on the foresleeves I started putting together the bodice. This has been the most exciting part! The bodice has a very feminine form but (as I thought) the square neckline was too large for me. I noticed it immediately and after cutting front and back panels I shortened shoulders.  This process forced me to pleat upper sleeves a little, so my dress looks like a Tudor court gown with...puff sleeves. Yeah. *laughs*.

 photo 10526134_437075279768920_183374349323247851_n_zps60735b3b.png

Anyway, I chose as main fabric for the overdress a beautiful burgundy taffetta which looks sooo period without being too much expensive (5€ at mt more or less). I already faced this kind of fabric with a bought skirt which needed a new hem but this one is less soft and bright, so I think the skirt is made of silk taffetta, while mine is of polyester (reenactors, don't read!). I still have to iron it so don't watch the wrinkles.
The fabric, anyway, is really easy to be cut but be careful when starting to baste it: use a very thiny needle and make small stitches. This works with pins as well so pay attention when pulling them through the fabric because you may risk to torn it! Every stitch is almost visible with this fabric so be really careful and patient. I used pins to keep together skirt panels (but we'll talk about that later) and a normal basting thread for bodice and sleeves.

  photo 10556411_439510146192100_4416516258348471385_n_zpsae90c0d5.png

 photo 10245578_439539019522546_63121573837466998_n_zpsf33842ab.png

I'm totally in love with the end of the bodice. I have seen many Tudor gowns with rounded  bodice base but this pattern as a pointed base which drives me crazy everytime. I can't wait to attach the pleated skirt to see the effect!
I clean-finished the back bodice before proceeding with the sleeves and my boyfriend/tailor assistant/photographer has been so kind to apply eyelets on the back. The dress should be boned for a perfect shape and even if I decided to avoid them and wear it with a separate corset as underwear (girls, keep in mind corsets or stays are studied to stay under your clothes, not over as in the modern gothic-victorian fashion so don't think to put a corset on your Tudor gown!!), it needs eyelets. It's an important part of the dress because it gives a correct period look and no one will know if your gown is boned or not unless you won't say it. The corset gives a completely different shape to the bodice, it keeps your breast in place and gives you a better posture. I use a normal halfbust corset in burgundy velvet with steel bones.

Now let's talk about sleeves. Upper sleeves are a sort of normal t-shirt sleeves and you don't need more suggestions about them. Lower sleeves have to be discussed a little. While attaching the sleeve you have to work on the right side of fabric, because those big sleeves have to be reversed to show the lining. I didn't have enough budget to buy a contrasting lining so I chose a simple black satin which will be used for the veil as well. It's not so difficult: after sewing the sleeves take the lower edge and reverse it, attaching it to the upper sleeves. The lower hem will be the hem of the new, shining, sleeve. After this process, the upper part of your overdress is done (trims exclused, for sure).
Now, it's time to put the bodice on and attach foresleeves to the dress using ribbons. As I told before, foresleeves were tired to the main dress with ribbons sewn at the base of lower sleeve (where you reversed the sleeve, to be clear). My foresleeves still have to be finished with the inner sleeves so consider them a work in progress.


 *End of part 2*
Don't forget to follow me on Instagram for more photos! http://instagram.com/danielle.fiore

sabato 28 giugno 2014

Edwardian dress diaries

Hello folks! Finally I have some spare time to write a new entry!
Some weeks ago we had a lovely sunny day here in Italy and after taking some classical shots I could come back home to wear my Edwardian outfit! I started to sew a year ago and this is my second Edwardian inspired ensemble. I know it's not 100% accurate (as my other costumes) but I don't have advanced skills and my budget is quite small. I used Simplicity pattern n.8399 as the previous Edwardian/Titanic era costume I sewed (full tutorial here: http://daniellefiore.blogspot.it/2014/05/titanic-downton-abbey-inspired-dress.html) but with some differences: I decided to avoid the open overdress as in the previous one since it looked too much Regency at my eyes due to the huge back (it needs lot of pleats). With this one I did pleats on the back trying to make it more fitting, but I think it's still too large on the hips. 


The fabric is soft grey striped satin cotton with a black satin ribbon laced on the backunder the bust. The lace is the part I love at most: I found it at the local market at a very cheap price! I simply love how it falls on the arms. I know the hat is not Edwardian but I still have to find one. As jewels I wore a pearl parure without rings or bracelets. They cannot be visible but I was wearing a pair of black leather boots (for a good pair of Edwardian shoes check American Duchess out, her creations are awesome!). And now the parasol: it's a truly vintage piece from 50 years ago and it completes the look perfectly with all that white lace.


I didn't take so much photos during the construction - I'm so sorry - but it's the same of the previous costume. I uploaded some photos on my Instagram account, anyway: 


The fabric is really soft and smooth, a pleasure to work with! The only problem is it need lot of ironing before being worn.
Other shots from the day: 


I really enjoyed the walk with the costume, I wore it during an historical fair as well and some people asked me where they could find a dress like this :3 I was pleased because they were all surprised I'm a beginner costumer and seamstress *pride&joy*
I'm planning to sew other Edwardian costumes in the future, I'm in love with the swimdress worn by Kate Winslet in Titanic so who knows...maybe I'll try to reproduce that one.

All my costumes can be purchased on my Etsy shop: http://www.etsy.com/shop/ilfiorenero
I hope you'll have some minutes to visit it!

*Updates September 2015*
I stitched again this dress, giving it a more elegant shape. The skirt has been hemmed in a better way and I added a black trim at the bottom. Every seam has been serged (no lining due to lack of budget). The lace has been sewn completely by hand.
The costume is listed on my Etsy shop and it's ready to be shipped! :)


Post in evidenza

Edwardian skirt and blouse, circa 1900-1905

I've always been fascinated by the style of early Edwardian era, with those lightweight blouses, fabrics, delicate laces and floating s...