Visualizzazione post con etichetta belle époque. Mostra tutti i post

giovedì 1 ottobre 2020

1890s Cheerios jacket

 Let's talk about another project made this year during the lockdown. Take a drink, eat popcorn because this jacket has a long story. I called this project "Cheerios" because of the colour of the fabric. 

After watching Crimson Peak movie a couple of years ago I fell in love with the costumes and immediately wanted to reproduce the yellow dress, though it's not properly my colour. I went to the fabric shop, found some lovely mustard cotton but then I realized it wasn't enough for a complete dress. Nevermind, I bought it with the intention to make a fitted bodice. I adapted the pattern to my measures, cut the mockup, did some fittings, cut sleeves lining...and put everything in a box for 3 or 4 years. Don't ask me why I didn't finish it before. There was something wrong with me and my mind and I was literally afraid to start working on that out of stock cotton (you know...no room for error!). 

So I waited. And waited. And waited. Until last year, when I found the mock up in a box and remembered of this project. I put the mockup on the dress form and it looked ok but when I tried it on, I immediately realized there was no enough room for the overlap at center fronts. I did darts smaller, put a facing. Nothing. It was way too tight. This was probably the reason why I didn't finish it back then. Totally discouraged, I took the mock up and put in the box for some months again. 

During the lockdown I was looking for some easy sewing projects to do using stash materials as long as I couldn't order something new and - oh! - this little thing came to my mind again. This time the sewing Gods were with me. I tried the mock up on and - omfg - I understood I could turn the bodice into a fitted jacket with reverse, MY FAVOURITE THING! Squeeee! I rip the mock up, cut the fashion fabric, assembled the whole thing and admired how beautifully this jacket looked with a plastron instead of a sleeveless blouse. 


I ordered an antique silk organza and lace plastron on eBay but alas it was too delicate so I used it as reference to draft a pattern and make one of my own using some cotton and laces from stash. So much better as I could move and breath in the jacket without ruining the delicate silk organza. After finishing the bodice and adding the boning  I worked with the sleeves, which were incredibly big; they are attached to a fitted sleeve lining so there's no way to use sleeve supports; I stitched some netting in the upper cap of the sleeve to give just some support. 


Then I made buttonholes (later covered by hand) and used vintage honey buttons to close it. 


And it was done!

Then summer came and couldn't wear it until last weekend, when the weather finally allowed me to  put it on for the whole day. And my friends, it was a success! Enjoy! Sometimes it's amazing to see how wrong projects can turn into something beautiful and unexpected. I wore it with a matching hat with vintage veiling, antique silver buckle, gold pleated earrings and antique cammeo. 


lunedì 8 ottobre 2018

1910s walking dress (revisited)

Available on Etsy: HERE

A project from a couple of months ago, at the beginning of the spring. I had to attend a Belle Epoque picnic in Turin in the city center, so I needed a dress elegant and practical at the same time. I didn't want to spend money on a new dress so I decided to restyle an old Edwardian/Titanic era dress I had in my wardrobe. Made in 2014 and restyled the first time in 2015, the dress was actually wearable despite its technical issues but it needed a massive, new restyling. You can read about the two previous makeovers here

I basically left it unaltered as it was made in 2015 but I remade the hem (the skirt was too long), the back pleats and the inner seams, including all the serging. I also removed the macrame lace and went for some velvet ribbons, all hand sewn.


And some photos of the event...


And the dress in motion!


It was cloudy and rainy so I wore my 1910s velvet coat. 
The flower under the bust is a tribute to Paul Poiret, plus it's part of my brand's name! The dress form does not give justice to the gown, which looks better on the real body. Unfortunately I still dislike how the skirt falls on the back, plus the neckline is really too low behind the neck BUT despite this, is still a lovely costume I'm planning to wear for another couple of times. I still have to make proper photos with it on so let's keep in touch! 


martedì 11 settembre 2018

Edwardian skirt and blouse, circa 1900-1905

I've always been fascinated by the style of early Edwardian era, with those lightweight blouses, fabrics, delicate laces and floating skirts. While I made a lot of 1910s costumes for me and clients, I never had the opportunity to make something earlier for me except an old white dress made after a Butterick pattern. 

Last Sunday I had to act in a very early Edwardian event so I definitely needed to sew something. I wanted something practical but elegant at the same time so what's better than a blouse and a skirt? Unfortunately I didn't take construction pics, the process was extremely fast. 

Fabrics used:
- Cotton sateen in brown for the skirt, flat lined in cotton
- Cotton voile in white for the blouse (Ikea curtain, from a thrift store), flat lined in cotton
- White lace fabric for chest insertion and cuffs
- White lace trim to cover up chest insertion

Blouse was made first. I cut bodice, peplum and sleeves before working on the lace. Cuffs are lined in cotton while the rest of lace is not lined. Sleeves and blouse botton were then gathered to fit armhole, cuffs and peplum. When I was done with the cotton and the lace I attached a cotton tape to refine the raw edges instead of making a facing and hand sewn snaps over there as fastening. In this way the edges were reinforced and cleaned at the same time and I didn't have to sew buttonholes. I used the same tape to make collar hem. 

Then I worked on the skirt. I flat lined it in cotton to add support and I'm so happy with this technique. It truly makes THE difference in how the skirts falls, especially in the hem. The skirt has two deeps pleats at center back and placket opening on the left side with snaps. The hem is turned with wide bias tape. 
I wanted to add a velvet ribbon as decoration to hide the stitching but I was in a rush...

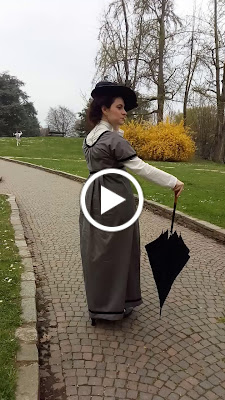
I managed to take some photos before the event. The hat was also made by me last year and it's all made of black cotton sateen with ostrich feathers. 
Necklace and parasol are antique pieces from my collection! I have an addiction for mourning jewelry and accessories...


More professional shots...


More to come!
I'm really happy with this outfit, the blouse fits like a glove and is really comfy to wear in the summer heat. Being white it can be combined with a great variety of skirts so stay tuned! 


mercoledì 3 gennaio 2018

Making a black 1890s outfit, part 2

Let's go with the second part of this project. To be honest the outfit has been finished and already worn but, as usual, I'm always late with the blog :( 

So, after finishing the skirt and hand sewing the trim all around the hem I started to work on the blouse. It was essentially draped on the dress form to fit since my pattern was incredibly short waisted, probably designed to be sewn to the skirt. I suppose this was called for a theatrical use.  
This process took a while but it was worthy.

The upper part of the neckline is gathered to fit.


The pattern didn't have any tips for fastening so after looking to some extant pieces I went for back fastening with fabric covered buttons. 

The hem of the blouse is bounded with black cotton bias tape and the seams are gently boned to keep it in place when worn. 

Now the sleeves. I didn't want exaggerate sleeves in my blouse and luckily, the ones in my pattern weren't so big! I just did some basic alterations to fit my arms and they were ready! They're flat lined in cotton as the rest of the blouse; for a more puffy look I should have added some padding (maybe organza ruffles?) between the lining and the fashion fabric but I'm happy with the result. 

And that's all! The making of the skirt and the blouse took about a week: I'm losing weight and I needed to shorten the waistband of the skirt, which took me a while (rip it off, measure again, shorten it, make the back pleats again, baste the whole stuff together, try it on,  remove hooks and eyes on the left side and sew again). The collar turned out too big but this can be easily fixed in a second moment. 
It was a very simple and fast project, not bad to be my first jump into the 90s! I also purchased a pattern for an accurate hat. 


venerdì 20 ottobre 2017

1912 purple dress: worn and loved!

Hello guys! In my previous post I talked about my new 1912 purple dress, all made of cotton using a Butterick #6093 pattern. Now that I made and wore the dress twice I can say I totally LOVE how it turned out! 
But let's take a breath and start from the beginning. 


As anticipated, this pattern as some fitting issues. The chart is purely indicative, the skirts are really tight so go ahead and plan to use at least 1 size bigger than yours. I ended in enlarging them of 10 cm to fit comfortable. Maybe they're a little too large but now but at last I can move in them without risking to rip the seams off! 
The bodice has also lot of ease in it. My suggestion is to measure yourself from side seam to side seam across bust at front and back and choose the best size. I used a size 12 for the front and size 6 for the back so yeah, measuring is totally necessary. The bottom of the bodice is then machine gathered to fit. Gathers can also avoided but you will need to use some math and draft a new bodice. 
A mock-up is strongly recommended, do not skip this step. Despite that, the dress went together really easily and straightforward. 


I used some black cotton in my stash to make collar and cuffs. They're both interfaced. 

I also pleated the skirts at front and back and added two more pleats in the upper part of the overskirt. The pattern calls for two overskirts for view A which in my opinion are a waste of fabric; if you have enough go ahead and add the other one and ignore my words, but if you don't have enough yardage skip it: the dress will look great the same and it will lighter to wear! For sure you don't have to skip the underskirt. 
I also shortened the upper part of the skirt about 3.5 cm to fit my body shape better simply folding the pattern and tracing a straight line onto the fabric. 

Now the best part: I have a zipper! Yes, you read it: my dress closes with an invisible zipper. I hate sewing hooks and eyes AND with the last 1912 I had some problems in dressing by my own. So I didn't bother about accuracy and inserted a discreet zipper in the left side seam of the dress. So easy!

The belt has the last step. It is interfaced and decorated with a bow. It closes with hooks and eyes. 


The dress is worn over chemise, corset and petticoat and a lace shirt. I'm planning combinations asap. I completed the look with vintage accessories and hat. 


And that's all! The whole thing took about a week to be completed, all by machine and serger. The only hand stitched parts are the black cuffs and the black bias tape in the overskirt. I sew for others and I work on my projects just when I have the time so I would say this dress would take about 2-3 days to be completed on a normal schedule. 
I'm so happy with this dress, it's comfy to wear aaaaand I didn't have to shorten the skirts: they were of my exact length! Yay! Plus, they're not super long so I don't have to keep them up while walking. It's definitely one of my favourite costumes ever. 

sabato 23 settembre 2017

Planning a purple 1912 dress with Butterick 6093

Hi everyone! Fall has finally come so it's time to think to incoming projects, such as heavier dress, coats and shawls. Awwwwwwww!! I love autumn so much! 
So, next week or so I will attend a vintage event set in different eras and my group will be involved into the 1800s and 1900s part; I decided it was the perfect occasion to make a new 1912 dress after getting such lovely commnts after my pink chiffon one. It seems you guys really like this style on me and I have to say it fits my body type kinda good (my hips are not of the same opinion lol).

I have been gifted of Butterick #6093 pattern for my birthday. It has been released a couple of years ago in their Retro line and I'm so happy to have it in my own collection. My boyfriend gifted me the complementary jacket pattern as well but I just had the time to look at the instructions so for the moment I won't talk about that. The envelope suggests two different layouts, a dress with single lapel, lace and long sleeves and a simpler one with collar, short sleeves, cuffs and double skirts. They're both lovely but I want a simple, practical dress to walk in. I chose view A but with a single overskirt. 


Before getting into the cutting stage, I obviously did a little bit of research. I wanted a purple dress from ages after finding a beautiful cotton at my local fabric store so I didn't have doubts about the colour of my dress. It seems purple was a popular colour back then and I found very lovely photos: 


Kent State University

Kent State University


Kent State University

Kyoto Costume Institute

V&A Museum

Oh look! Downton Abbey!

I will add black collar for contrast but I'm unsure about the cuffs. The white/purple version worn by Lady Sybil in DA is really lovely but being a gothic lady the black/purple combo is so fascinating! 

After looking at the photos I started to read online reviews. The Pragmatic Costumer has the most detailed and technical reviews for this pattern; she made several versions of this dress and she has been my bible for this project. The dress has a very slim, columnar shape of the skirts which is accurate but kinda impractical - especially if you have large hips like me. She suggested to chose 1 or 2 sizes bigger for the skirts and she was absolutely right! I measured the pattern and I immediately realized I could never, never, never step into my usual size. For the rest, the pattern instructions are really straightforward and easy to follow. 

The pattern is labelled as "easy". Nah. It's definitely not an easy pattern for beginners. You have to know how to install zippers or hooks and eyes, use facings, apply collars and linings, make gathers or pleats. Not the first steps in sewing. 

The dress is designed for lightweight fabrics like cottons or silks but I think a medium weight fabric would work good the same. My fabric is 100% cotton with white cotton lining in the bodice. 

And that's all for now! Now off to cutting! 

Thanks for reading! 

Post in evidenza

Edwardian skirt and blouse, circa 1900-1905

I've always been fascinated by the style of early Edwardian era, with those lightweight blouses, fabrics, delicate laces and floating s...