Visualizzazione post con etichetta seamstress. Mostra tutti i post

sabato 22 aprile 2017

Making a red open robe from "Patterns of Fashion" by Janet Arnold, pt.1

And here we are! After months of planning I can finally start to work on my open robe. I'll use the famous pattern in Janet Arnold book "Patterns of Fashion 1". I read a lot of tutorials on the web before getting involved in this project because you know, curved pleats are not so common and I read some contradictory opinions about. Some costumers consider it easy, others not at all. I was a little bit scared at first but then I realized I would have sewn them by hand so with more control than using a sewing machine. 

The pattern:


And the original garment in V&A museum: 


Some details:
- Length from CB to floor is approx 174 cm, which works great for me
- Underbust circumference is approx 87 cm, another great measure for me 
- Bodice lined in linen

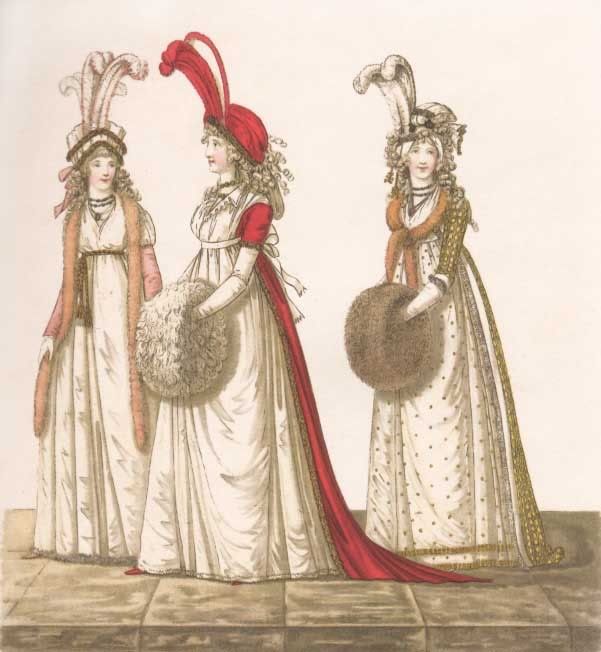
Last month my group (Le vie del tempo) started a series of events set in the very late 1790s, so I had the occasion to make a Directoire dress. I always loved the look of open robes so I decided to make one as soon as possible to add a touch of elegance to my costume; I obviously started with a research and I found nice examples both in fashion plates and extant garments: 


I  immediately fell in love with the red one (and yes, red is my favourite colour!!) so I went to my local fabric store to purchase some beautiful bright red cotton cretonne. I will make mine sleeveless because I love how the elbow sleeves of my dress turned out. 

First of all my boyfriend scanned and printed out the pattern. I traced it onto paper marking all the lines and the pleats and in less then 20 minutes I was done. I put the paper pieces onto the dress form and realized then the bust was slightly small (My back shoulder width is huge despite having a small bust) so I added an extra 5 cm to the pieces to fit. And that's all I did! Now I have to do a mock up and see how the whole thing fits on the real body. 
Thanks for reading! 


domenica 26 febbraio 2017

18th century pocket hoops

Iconic and easy to make: I'm talking about the famous pocket hoops worn in 18th century!


Beginners or people not involved in historical costuming may find this term strange so let's give some explanation below: pocket hoops were structured undergarments worn in 18th century to support skirts and give volume at sides, as women's fashion of that time asked. They were boned to be supportive and flexible and could be used as small pockets too (as the name suggest); an opening hidden in the skirts allowed the hands to reach the hoops underneath.
Pocket hoops must not be confused with panniers, which were definitely bigger and worn during formal occasions like balls or court events. Pocket hoops were smaller and easier/lighter to wear. 

An example of extant panniers: 

Hoop petticoat or pannier, English, 1750-80. Plain-woven linen and cane, LACMA.


And pocket hoops:


The difference is really clear :)

Now, let's return to my pocket hoops. I drafted them using Norah Waugh pattern in "Corsets and Crinolines" book without big alterations; the beauty of pocket hoops is they don't need to be custom made because they're fitted to the waist with ribbons! Easy, uh? Mine are in cotton but linen can be used too; the only limited is your imagination, taste or stash! 

I boned them with reed for accuracy but also synthetic whalebone or steel boning are good materials to work with. These pocket hoops closes at waist with cotton tapes that run into a casing. 

Side slash opening - hand sewn.


Pocket hoops worn with petticoat 

They turned out really lovely and are a nice addition to my 18th century closet. My first pair of pocket hoops was awful (they were made from a Simplicity pattern...) and they didn't support the figure even if they were strongly boned and made of linen. 

This pair of pocket hoops is listed on my Etsy shop too, give it a visit! 

mercoledì 8 febbraio 2017

5 basic tips to work with velvet (and cousins!)

Velvet. The king of fabrics. Really, velvet is from centuries one of the materials connected to royalty and richness with its soft pile and incredible texture. But - for us dressmakers - how velvet can turn into a nightmare our sewing project? Many times, trust me. It happens to experienced seamstresses too so no worries! In this little guide I'll explain you some tips to work with velvet (and cousins - like crushed or stretch velvet) and 
If you're here, I'm sure you probably faced the problems related to velvet so let's get started.

Crushed/panné velvet

Silk velvet


1. Stay calm.
Sewing with velvet can be hard but it's not impossible. First of all, you must keep in mind you're working with an expensive fabric (as silk) so think twice before cutting. Do all the mock ups you need, take all your time but stay calm. Hurry can be your worst enemy. If you want to serge your velvet make a try on some scraps before proceeding: not every velvet type is serger-friendly. 

2. Forget your iron
Don't miss this step! Your iron can ruin your fabric irremediably. The heat can damage and burn the pile of velvet so use your iron always on the wrong side on the fabric, avoiding to touch it; some steam may be used but be careful to don't touch the pile.


3. Clean your workspace
Velvet doesn't fray easily but it leaves lot of small, fluffy balls. Breathing these balls can be a problem for your health so always keep your vacuum near and clean your working space often. Wearing a mask can be useful too. 

4. Pay attention to nap/pile
This is the  most important step, in my opinion. A garment sewn with two different naps scream homemade (remember: your creations must look handmade and not homemade, these are two different things) but  this mistake can be easily avoided paying a little of attention. The nap is the direction of the pile, which can run up or down; usually, the nap running down gives to the garment a darker, richer tone. There's not a general rule (up or down is the same) but the important is to cut the pieces in the same direction: this may require extra yardage so check out the instructions on your pattern envelope.


5. Hem by hand when possible
Velvet may stretch a little, especially on edges, and it can roll on the inside. This counts especially for crushed and stretch velvet. Hemming your garments by hand is a good solution to control stretching: bias tape could work good for this purpose, using a hemming stitch on the inside. Never leave your hems raw! 

mercoledì 14 dicembre 2016

The real life behind social medias

This post is about reality and real life. No, it's not the classic "what's my daily routine" post but something more serious, concerning OUR life as bloggers/costumers/seamstresses/models/human beings. In 2015, Lauren of Wearing History started a challenge called "The myth of perfection" in which she explained with photos how social medias can distort the real "us", because on the web you show to the public what you want. And the public will believe you, because people don't know what's happening behind/before/later that photo or video has been taken. 
Social medias may be a dangerous place. I mean...we all have real lives and social medias are often a way to get relaxed, to escape from reality, a personal place. So we want to show our best: our new fabrics, our new dress, our new shoes, our new house...and so on. People often look fabulous, happy, successful: but what's behind? 

I read several post related to this challenge and I decided to do my own. Ok, it's from 2015. I had to contribute last year and I forgot, as often happens because my life is kinda a mess. Like my flat. So, let's get started! This is my real life behind photos shared on social medias.

I'm often told I always look extremely serious and austere in photos but I'm an outgoing person. Seriously, I can laugh (ask my friends)! But in the years I developed the idea I'm ugly (being bullied at school for years didn't help...) and I look extremely ugly in photos while laughing or not being perfectly posing, so I wanted my "modelling character" to be like this: serious, proud, pretending I'm really self-confident about my appearance. 


This shot was taken for an Italian magazine in 2015. I was literally melting for the hot weather, was wearing chemise and corset and trying to use the hoop as tunnel for the wind. A really nice experience but with a sad epilogue: I slowly left modelling after the magazine came out. My parents ignored it completely. 


Always in 2015, wearing my Anne Boleyn inspired gown at an event. I was so happy with this dress but after the ball the dream became a nightmare: our 18 years old car started to stop every 10 km and we came home after 7 hours (7!!) of journey (my town is just 3 hours from where the event was located). 


A victorian photoshoot taken in a very old house. The day after me and the photographer developed a very bad urticaria which required months of medicines to go away. A terrible experience - but the photos were lovely. I had to sit on that sofa because I didn't get my 1850's hoop-skirt on time. 


A shoot we did for my shop, with a landed camera. Our previous Canon broke in 2015 and we could buy a new one only a couple of months ago. At that moment I didn't know when we would be able to shoot again. Due to the shadows on my face I also look fatter and for a woman that always had weight  problems it's not ok. 

All dressed up for a 18th century event in September. I didn't sleep enough the night before because I couldn't finish the ruffles on time  and got a terrible headache after lunch so that I had to remove hat and hairstyle. The day after, I started to have painful abdominal pains due to the corset. 


First Regency event in July. Literally melting in this cotton dress and feeling quite embarrassed because it was the first event with "Le vie del tempo" and I felt very shy so I ended to spend the day in a corner speaking just few words. I was sure the ladies of the group didn't want to see me again!


In Rome, always this year. I had a terrible headache the days before the event, it was really cold (strange weather to be in April!) and my palla wasn't heavy enough to keep me warm. My face and puffy eyes explains everything. 


Back to 2012/2013, one of the hardest moments of my life. Me and my hubby where jobless and forced to live with my parents; we were hopeless and money less and I couldn't afford to buy new clothes for the photo shoots; I started to left modelling, I didn't have enough money to travel and photographers didn't contact me anymore. This photo has been taken near home on a bicycle path. I was really sad in that period and I barely left my house. 


Feeling fabulous in this pre-raphaelite photoshoot for a calendar in 2014. Some days after I had the most awful experience of my life with some customers. 


Second ante-bellum dress, taken from a Simplicity pattern due to lack of time. The back of the bodice was too long for my body shape and full of wrinkles, the skirt ended to be too long and the I discovered someone laughed at my back because - as costumer - I used a premade pattern instead drafting one by my own. This hurt me a lot. At that time I was working on two time-consuming commissions and hardly had the money to buy this white cotton. I had lot of stress in making this costume, with an old sewing machine and awful buttonholes. I also ruined a armhole with my serger and had to fix the hole by hand. 
Now sewing has become my full-time job: sometimes I DON'T have the time to have lunch breaks properly, I miss things and appointments, no social life at all, I get totally stressed but I didn't allow these bad voices to ruin my life and stopped following my dreams! 

And that is! Hope these captions helped to show you we all have a real life behind our modelling shots, perfect fitting clothes and so on: never, never, forget this and remember successful people always were beginners once! 


mercoledì 23 novembre 2016

Pink robe à la française from Norah Waugh "The cut of womens' clothes"

As stated in a previous post, I attended a 18th century reenactment event in September and had to sew a proper court dress. I already had some beautiful pink satin in my stash so I just had to decide which kind of dress I wanted to wear; I couldn't get decided between the classic sack dress and the more comfortable (in my own opinion...) robe à l'anglaise, and in the end I went for the first one which looked better in pink.
I used the pattern provided by The Cut of Women's Clothes by Norah Waugh and I can say it surprised  me: the pattern needed just some basic alterations and the dress came together really quickly. The Watteau pleats took a while to be done and aren't still perfect but I'll work on them later. 

Now, my pattern:

I took the measurements wearing full undergarments but - however - the sides ended to be longer than I expected, giving the bodice a clumsy look. The back of the bodice has eyelets for accuracy and it's all flat lined in cotton to add more support; on the other hand, the sleeves and the skirts fit perfectly.
The stomacher is fully boned and it's a separate piece pinned to the stays; at the beginning of the day I pinned it to the dress but the weight of my satin stressed it a lot so we stitched it to the robings. The petticoat is made of the same ivory brocade of the stomacher but just at the front; the rest of the petticoat is made of cotton. The whole dress is trimmed with white cotton ruffles, all pinked by hand and hand sewn over the robings and skirt openings.

For those who asked...no it's not a wig :) I also wore a cheap straw hat with paper flowers since I didn't manage to sew a lace cap.
To be honest this dress is not a masterpiece but it's ok to be the first sack dress and to have finished it the night before the event. There are several issues to fix but we're all here to learn =) I dislike the lower sleeeves too, they're too big and cover the engageantes completely.
It was a very sunny day and my delicate eyes couldn't stand the light enough to take some decent outdoor shots so excuse for my bad expressions!

Pros:
- I learned to drape Watteau pleats better
- Proper colour and fabric choice
- Easy pattern to work with

Cons:
- Not too wide panniers
- Bodice sides too long
- Engageantes not visible as I wanted


Some references I used, dating from 1750 to 1770:


domenica 30 ottobre 2016

Claire Fraser yellow gown from Outlander season 2

Ah, Outlander season 2... those costumes, the parisian atmosphere, the luxury of the court... simply amazing. I loved everything, especially the strongest relationship between Jamie and Claire.

Concerning costumes, I immediately fell in love with the yellow gown Claire wears in one of the first episodes of the show:


After doing a little bit of research I decided to reproduce it for our Etsy shop. The dress looks like a typical mid-1700's gown with contrasting stomacher and petticoat but it's not a robe à la française (I would say it definitely looks like a later gown for the pleated back...); it's worn over proper pocket hoops and the outer edges are embellished with black trim. Easy, simple but elegant (and yes, yellow was a very popoular colour in 18th century: Terry Dresbach knows her stuff!) so started to work on this model at the beginning of the summer. 

I sewn in total three versions of this dress in different sizes and this is one of them, created for a client in size 16. 


The fabric is gold satin duchess with contrasting cotton satin printed with flowers; the bodice is flat lined in cotton to add support and it's not boned since it has to be worn over stays. The black organza trim is all hand sewn and attached to the lining with whip-stitches. The elbows are trimmed with a gold ruffle made of the same fabric. 

I also did a version of the short cloak since the client requested it. 


 The cloak is lined cotton to be warm and has a generous hood. 
The whole outfit took almost three weeks to be completed but it turned out really lovely. The photos don't give it justice, I have a couple of photos sent by one of our clients (for their privacy I cannot publish them yet, it seems legit!) and it looks amazing, the back of the dress ends with a slight train and the sleeves look so rich! Yummy!

To order your own dress, visit our Etsy shop or click on these links: dress and cloak. We strongly recommend to choose the right size after taking measurements really carefully! 

Post in evidenza

Edwardian skirt and blouse, circa 1900-1905

I've always been fascinated by the style of early Edwardian era, with those lightweight blouses, fabrics, delicate laces and floating s...