Visualizzazione post con etichetta dress. Mostra tutti i post

mercoledì 8 febbraio 2017

5 basic tips to work with velvet (and cousins!)

Velvet. The king of fabrics. Really, velvet is from centuries one of the materials connected to royalty and richness with its soft pile and incredible texture. But - for us dressmakers - how velvet can turn into a nightmare our sewing project? Many times, trust me. It happens to experienced seamstresses too so no worries! In this little guide I'll explain you some tips to work with velvet (and cousins - like crushed or stretch velvet) and 
If you're here, I'm sure you probably faced the problems related to velvet so let's get started.

Crushed/panné velvet

Silk velvet


1. Stay calm.
Sewing with velvet can be hard but it's not impossible. First of all, you must keep in mind you're working with an expensive fabric (as silk) so think twice before cutting. Do all the mock ups you need, take all your time but stay calm. Hurry can be your worst enemy. If you want to serge your velvet make a try on some scraps before proceeding: not every velvet type is serger-friendly. 

2. Forget your iron
Don't miss this step! Your iron can ruin your fabric irremediably. The heat can damage and burn the pile of velvet so use your iron always on the wrong side on the fabric, avoiding to touch it; some steam may be used but be careful to don't touch the pile.


3. Clean your workspace
Velvet doesn't fray easily but it leaves lot of small, fluffy balls. Breathing these balls can be a problem for your health so always keep your vacuum near and clean your working space often. Wearing a mask can be useful too. 

4. Pay attention to nap/pile
This is the  most important step, in my opinion. A garment sewn with two different naps scream homemade (remember: your creations must look handmade and not homemade, these are two different things) but  this mistake can be easily avoided paying a little of attention. The nap is the direction of the pile, which can run up or down; usually, the nap running down gives to the garment a darker, richer tone. There's not a general rule (up or down is the same) but the important is to cut the pieces in the same direction: this may require extra yardage so check out the instructions on your pattern envelope.


5. Hem by hand when possible
Velvet may stretch a little, especially on edges, and it can roll on the inside. This counts especially for crushed and stretch velvet. Hemming your garments by hand is a good solution to control stretching: bias tape could work good for this purpose, using a hemming stitch on the inside. Never leave your hems raw! 

martedì 19 gennaio 2016

A medieval-fantasy gown: Eowyn

Do you remember the green and gold velvet gown worn by Eowyn in "The Two Towers"? The movie came out in 2002 and since then I've been a huge fan of that dress. It looks soooo medieval, with the long hanging sleeves and the beautiful gold details...a dream! I never had enough budget to buy a replica of the costume so - ta-dah! - I bought a commercial pattern to sew my own version. The pattern still lays in its envelope due to lack of time but I managed to sew a very personal version of the costume with matching colours but a different design. 


For this costume I used a beautiful emerald green crushed velvet as main fabric and gold satin for the contrasting panel and the lining of hood and sleeves. I'm not a fan of poly satin 'cause it frays a lot and it's looks really cheap but you know - budget is budget. To my customers I recommend to choose taffeta, which has a richer texture than satin and looks less fancy.
The dress design is a classic: a medieval-fantasy dress with hood and square neckline, with front and back lacing. Nothing new but this is the kind of dresses which fits me at best and I love to make. 
The lacing is made of fabric eyelets and satin ribbon. To hide the arm seam I hand sewn a piece of gold trim. 


The dress is really comfortable and the lacing allows a perfect fitting. I enjoyed a lot these photos in the woods - the beautiful necklace I'm wearing is by Aeternum Nocturne Jewellery. 
The hood is wide and covers the head like a glove, falling on the shoulders when not worn. The satin lining falls nicely on the skin and I love how it turns on the outside when the arms are left in a lower position. The crushed velvet is so bright and follows the curves of the body, a blessing for ladies who have large hips like me. 

Some professional photos:


This costume is listed on my Etsy shop and can be ordered in different sizes and colours. Feel free to leave a comment if you have questions about! 


venerdì 18 settembre 2015

Tutorial: convertire una gonna in un maxidress!

Oggi un tutorial di cucito facile-facile! 
Avete presente la sensazione di dover acquistare a tutti i costi quella gonna perché vi fa impazzire, anche se vi arriva sotto ai piedi? Ebbene, è ciò che è successo a me qualche anno fa, con questa gonna. Adoro da sempre le cose plissettate (assieme ai fiori, la fantasia mimetica, ai pois e moltissime altre cose...) e quando l'ho vista non ho saputo resistere. Ahimè, la mia taglia di fianchi corrispondeva a una delle misure più grandi e a circa 175 di altezza, ma l'ho comprata lo stesso, fiduciosa di riuscire ad utilizzarla. Con mio sommo rammarico, è rimasta nell'armadio per quasi due anni finché non ho avuto l'ispirazione di convertirla in un maxidress.

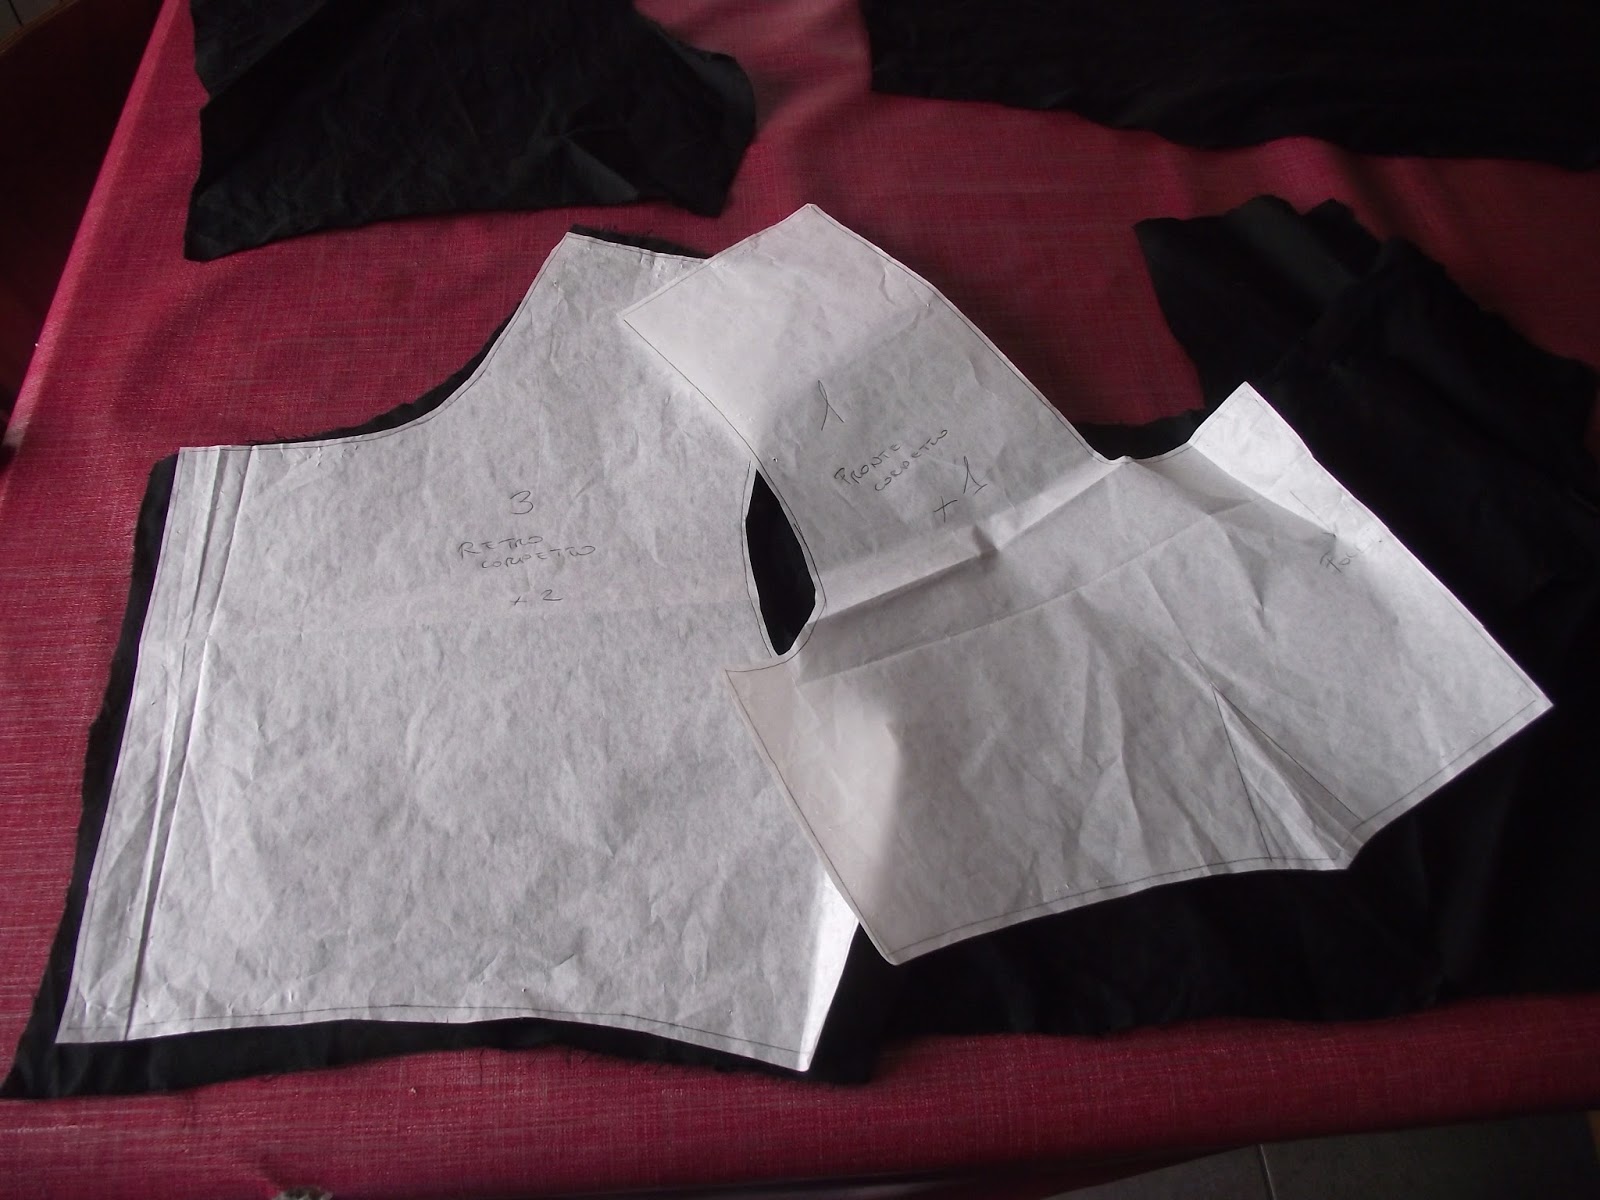
 Il processo è semplicissimo: ho disegnato un top a manica corta da attaccare all'elastico della gonna, che sarebbe così diventato il nuovo punto vita. Ho scelto del semplice cotone nero ma potete utilizzare qualsiasi stoffa vogliate (raso, jersey, lino...). Dopo aver provato il cartamodello sul manichino ho proseguito con il taglio e la rifinitura a tagliacuci. 
Per un effetto più curato vi consiglio di tagliare la parte frontale del corpino sulla piega della stoffa, in modo da evitare una cucitura nel mezzo. Se non avete una taglia e cuci potete rifinire le vostre cuciture con il punto zigzag oppure, per un risultato più pulito, una cucitura alla francese (di cosa si tratta? E' un sistema un po' laborioso ma davvero facile: cucite i vostri pezzi di stoffa dal dritto, quindi al contrario di come fate di solito, poi rifinite con le forbici la cucitura ottenuta e stirate, ripiegando il tutto al rovescio; a questo punto, cucite nuovamente e rivoltate tutto dal dritto: la nuova cucitura avrà inglobato quella precedente e avrete un lavoro pulito, ordinato e dall'aspetto più professionale! In poche parole, la cucitura del rovescio si "mangia" quella eseguita sul dritto e quando osservate il capo a rovescio non avrete fili sfilacciati che pendono dalle vostre cuciture). La quarta opzione è quella di foderare il tutto, processo che eseguivo in quasi ogni progetto prima di acquistare la mia tagliacuci (Il solo pensiero di applicare una fodera vi spaventa? Tranquille, ci va solo un po' di pratica e pazienza ma vi assicuro che il risultato merita!). 


Ho cucito le pinces all'altezza del seno e ho rifinito i bordi con del nastro sbieco nero in cotone, nella variante più piccola. Sul retro ho poi applicato una zip per poterla indossare più facilmente. Per applicare la zip ci sono diverse tecniche, il mio consiglio è di scegliere quella più adatta alle vostre capacità e di usare sempre l'apposito piedino.
La parte più difficile è stata calcolare l'ampiezza esatta del corpino in modo che combaciasse perfettamente con l'elastico della gonna, che deve restare invariato. Vi suggerisco di prendere bene le misure prima di inserire la zip; potrebbe essere necessario effettuare delle modifiche sul retro del vostro top e una volta tagliato...non si torna indietro. 
Come ultimo step, ho cucito il corpino all'elastico con uno zigzag per mantenere una certa elasticità. 


A questo punto, potete indossare il vostro nuovo abito e decorare il corpino come più vi piace. Facile no? Avete un nuovo capo nel guardaroba e non avete dovuto spendere altri soldi per farlo accorciare! ;)


Ed eccomi con l'abito indossato: lo abbino ad una cintura elasticizzata per un tocco più elegante.

Se il tutorial vi è piaciuto e/o l'avete trovato utile, lasciate un commento! 


giovedì 27 marzo 2014

Medieval dress "Igraine" tutorial

Hello ladies! Spring has officially come but the heavy rain of these made me think of winter :(
I  had enough time to start and complete a new medieval dress using the remaining burgundy fabric of my renaissance skirt. I used the Simplicity pattern 4940, designed by Andrea Schewe. The dresses displayed on the pattern remind a lot the Lord of the Rings costumes worn by Eowyn and Arwen. For my dress I chose the A model, inspired to Eowyn, and I want to use it for my personal project dedicated to Arthurian legends (that's why I called it Igraine).

 photo DSCF0346_zps41d55a32.jpg

Since I used a remaining fabric I didn't spend too much for this project and I had to buy the lace only. I took my inspiration from a gothic dress of mine (I admit) and I changed a little the pattern project since my dress doesn't have the collar and I avoided sleeves lining. The dress construction has been really simple even if I had some problems with the back due to the fabric, so I won't bother you too much. After cutting the pieces of the dress I started putting them together with the baste stitch and I've to admit this process took me a while since the pieces were really long. 
The sleeves have been easier to sew than I thought and I'm pretty satisfied :)

 photo IMG_8034_zpse269225b.jpg

As final touch I added black lace all around the sleeves and the neckline.

 photo DSCF0341_zpsfffdb652.jpg


 photo DSCF0345_zps702f708b.jpg
The finished dress on.
Igraine


What do you think?

venerdì 14 marzo 2014

"Lucrezia" italian renaissance dress

Hello folks, how are you? It seems winter is fading away, I really need spring! 
Today' I'd like to talk you about my last sewing project. It took me almost 5 months to finish it but I'm really satisfied! *smiles proudly*
I finally managed to sew an italian renaissance inspired costume, after watching several dresses during my researches on Pinterest (and Borgias, of course). I'm a beginner seamstress - keep it in mind! - but since many people asked me info about this project I decided to write an entry. First of all, I've to admit it's not a cheap project as the roman dress I sewed some weeks ago; I spent almost 70€ for fabrics, pattern, trims and threads and for me it's a small fortune. This is the complete list of used materials:

- Simplicity Pattern 9531, one of the closest designs to authentic renaissance fashion I found online
- 1.5 mt of red brocade for bodice and sleeves
- 5 mt of burgundy velvet for skirt and train
- 2.5 mt of golden trim

 photo DSCF0294_zps855c556e.jpg


I started measuring myself following the patten instructions, but then - alas - I discovered the bodice was too big to be a size 12. Cutting out the pattern is always the funnier part of the whole job, and I finished to cut it after a couple of minutes. I stitched together the bodice parts and the gauntlets but I had to made them tighter because of their size (so I would say to follow your own size with this pattern, because "bigger is better" is not the best choice!). Then I stopped this project since I couldn't find an appropriate fabric for the skirt. I had a beautiful burgundy velvet fabric at home but it wasn't enough for the skirt, even without train. After several months I could finally buy 6 metres of velvet from an online shop at an affordable price and so I started to work on the dress immediately. 
After cutting the skirt and train I spent a while attaching it to the bodice. The skirt seemed really big for my bust but - surprise! - I was wrong! After doing some ruffles on the back I could definitely see the shape of the gown, and I stitched all together with the sewing machine. 

 photo DSCF0298_zps53fcb3b6.jpg


 photo DSCF0310_zpsf77d7469.jpg


 photo DSCF0309_zps968dfc12.jpg


The trim took me almost a week to be sewed by hand with the backstitch, it was very heavy and the brocade didn't help. So after sewing it on the bodice I started to sew the zip on the back. I've to admit I used the sewing machine for bodice and skirt only, I find hand sewing more relaxing and "homemade". 
It was the turn of the gauntlets. I applied the trim and then, at last, I did the eyelets cutting a small hole with the découpage scissors. I spent some hours sewing their borders always by hand. Luckily the dress didn't need a huge hem and I just had to cut some cm at the front skirt. The last touch have been the red ribbons to keep the gauntlets attached to the bodice.

 photo DSCF0313_zps39219dbc.jpg


And that's the dress on during a shooting!

Renaissance

venerdì 21 febbraio 2014

Shooting: Valeria Forno Photography

Girls do it better. This one has been my first shooting with a girl after such a long time, and I'm really satisfied of these photos! I meet the young Valeria in Turin, to take some gothic, medieval and fantasy shots. Nothing new, you could say, but this was her first medieval shooting and I tried to do all my best to make both of us satisfied. 
And you, what do you think of our shots? ;)

Visit her Fb page here: https://www.facebook.com/ValeriaFornoPhoto

Medieval

Medieval

Medieval

Gothic

Gothic

Butterflies

lunedì 3 febbraio 2014

Roman dress "Gaia"

Hello guys, the end of the month is near and I'm passing these cold winter days sewing a new roman dress.
I found at the local market a beautiful remnant of deep green fabric in synthetic fibres (I think it's polyester) large enough for a dress, and so I bought it with another camouflage fabric. To be honest I wasn't thinking to another roman dress but when I saw the fabric I couldn't resist!

Roman Dress "Gaia" photo DSCF0281_zpsb07b4c26.png
The fabric
To sew this dress you'll need: 
- Fabric 
- Thread 
- Scissor
- A sewing machine, but you can avoid it if you want a more historical look. 

The fabric is soft as silk and the green is simply luscious! I didn't use a pattern so I put the fabric on the floor and I drew by hand the figure of shoulders with a chalk, after measuring my own shoulders. I have a one shoulder tunic already but for this one I wanted something different: I took my inspiration from the Spartacus TV series and I found in the character of  Gaia a nice reference: her dress has a deep V neckline and it's made of light green silk with golden embroidery, and the shape of the cloth seems quite historical.

Gaia
My dress will look like this on the shoulders but the neckline will be less evident and I'll wear a blue tunic as underwear since my fabric is quite see-through. 

The construction of the dress is really simple, so if you're a beginner seamstress like me you won't find it hard. So, after drawing the straps with the chalk I started sewing the hems by hand, finishing them with the sewing machine later for a better look. Then I sewed both sides together and put it on: I'm used to sew clothes a little bit bigger than my real size so I'll have to adjust the dress on my hips in a second moment. 

 photo DSCF0283_zps46531324.png
Particular of the seam
To decorate the shoulders I applied by hand two silver buttons with Medusa's effigy (I'm in love with them!)

Roman Dress "Gaia" photo DSCF0291_zps67d03a09.png
The buttons. 
Keep in mind: don't throw away scraps! You can always use them as ribbons or as decorations for your hair if they're big enough :) I'll use mine for the typical roman hairstyle I use during historical fairs. 
I noticed the dresses displayed in Spartacus have many layers of different fabrics but I find this style more fantasy than roman, even if women from upper classes wore dresses made of rich materials and with vivid colours. I hand stitched a hair comb to keep the veil on my head (don't forget this step if you don't want to lose it when you move, my suggestion is to make a braid and then put the hair comb there - a fake braid is good too). 

Total amount: less than 10€, if you're lucky it's a very low budget project!  

Photo by Franco Russo


martedì 24 dicembre 2013

Shooting: Mario Bosio


A special shooting for a special Christmas for you all <3 nbsp="">

All pics by Mario Bosio www.mariobosio.com
I'd like to thank the medieval reenactment group Arduino for the medieval blue dress in velvet. The renaissance inspired dress has been sewed by my own and needs some decorations still ;)


Queen of 9 Days


Medieval Princess


sabato 30 novembre 2013

Shooting: Silvano Cph

Hello folks! Today it's a snowy day in Italy! It's the first snow of 2013 and I hope it will be the last ;) I never liked snow, if you live in a big town it means more traffic, more problems to get out and so on, but if you can admire this natural show at home, sitting at your window with a cup of tea... oh well, that's nice then ;)
Anyway, I'd like to show you some pics taken last month in Turin, at the Valentino park. I met for the first time the emergent photographer Silvano Cph to take some gothic and medieval pics, and our meeting has been great!
The pics are really amazing and I hope you'll love them as I do =)

Legend

Silvano Cph


SilvanoCPh

by SilvanoCPh

sabato 14 settembre 2013

Shooting: "The River"

Last week me and Lele Photography went out for a nice walk in one of the many natural parks near Turin, where we live. With the help of two friends we managed to take some nice vintage shots. The water was really cold and full of mosquitoes, so it was not the perfect place for swimming eheh
I'd like to thank my friends Lavinia and Maria for their suggestions about my styling, I looked at many pics all around the web to find something nice and to look really...vintage. The dress is from the 70's and I used it last year for the concept dedicated to Flora, called "Madame des Fleurs". The book is "Pride and Prejudice" by Jane Austen, I thought it would be a perfect companion ;)

You can view the whole project on my Tumblr account too!


All pictures and editing by Lele Photography

venerdì 21 giugno 2013

Il look da "Southern Belle"

Chi non ha mai sospirato guardando i meravigliosi abiti indossati da Rossella O'Hara nel celeberrimo "Via col  Vento?". E' da quando sono bambina che sogno di poter indossare un abito simile, pur non amando le crinoline e le gonne voluminose, e di poter vivere l'atmosfera degli Stati Uniti pre guerra civile. Tornare indietro nel tempo non si può, ma si può provare a riproporre il periodo. 


Girovagando nel web, ho trovato dei preziosi consigli per ricreare il perfetto look da Southern Belle (l'appellativo dato alle ragazze bene del sud degli Stati Uniti, tipicamente colte, da sposare e benestanti) e, in fondo, non siamo poi molto lontani da alcune regole d'etichetta tipicamente europee. 

1. Una donna di buona famiglia non avrebbe mai mostrato nulla al di sotto della propria clavicola prima delle 5 del pomeriggio.
2. Le ragazze sotto i 21 anni non indossavano mai il rosso.
3. Un copricapo era sempre indossato quando ci si trovava fuori casa.
4. Nessuna dama avrebbe mai tolto i propri guanti, neppure per ballare. Tuttavia, mangiare con i guanti era ritenuto molto maleducato.
5. I capelli erano sempre raccolti all'altezza della nuca, e la frangia spostata indietro e trattenuta con delle forcine. Le uniche eccezioni erano i balli.
6. Le maniche erano sempre lunghe, fino ai polsi, eccezion fatta per le piste da ballo.
7. Le fanciulle non maritate non portavano piume per ornare i capelli.

Non vi sembra di fare un passo indietro, per molti aspetti, nella nostra società vittoriana? Tenete a mente che questo dresscode era molto rigido, e le regole andavano rispettate per intero. Se vi apprestate quindi a riproporre un look simile, ricordatevi questi semplici consigli. 
L'abbigliamento da Southern Belle non è poi così complesso da realizzare, ma richiede alcuni capi che non si possono tralasciare:

- Corsetto, indispensabile per ottenere un punto vista stretto e tenere su il seno. Se non ne avete/sentite la necessità, potete anche evitare il moderno reggiseno. In commercio ci sono diversi tipi di corsetti, se volete essere corrette evitate quelli steccati in plastica e con l'apertura frontale (busk), privilegiando l'allacciatura classica sul retro facendovi aiutare da un'amica. Io (purtroppo) possiedo soltanto quelli con il busk frontale, ma so che manterrete il segreto :p


- Biancheria intima di cotone da indossare sotto il corsetto e la sottogonna, in modo che queste non entrino in contatto con la pelle.

- Crinolina, nota anche hoop skirt. Si tratta di un capo da indossare sotto la veste, fatta di diversi cerchi che terranno la gonna estesa nella classica forma "pomposa" che tutti conosciamo. La crinolina deve sempre lasciare le gambe libere di muoversi e non deve mai fare capolino dall'orlo inferiore del vestito. Eventualmente, se la stoffa della gonna è sottile, potete indossare una sottogonna per nascondere i segni dei cerchi (chiamata petticoat). 

- Cappelli, guanti e forcine sono indispensabili per completare il vostro look. Non dimenticate mai di tenere i capelli raccolti se volete fare bella figura! Utilizzate anche un make-up leggero, privilegiando fondotinta in tonalità chiare. Se uscite, ricordate cappello e parasole per proteggere la pelle dal sole. 

Le poche licenze che vi sono concesse sono quelle riguardanti le scarpe. Le fonti ci mostrano dei semplici stivaletti di cuoio, non molto belli alla vista ma, suvvia, nessuno verrà mai a guardarvi sotto le gonne. 


Follow these rules in english here, this is my own italian version! http://www.wikihow.com/Dress-Like-a-Southern-Belle

Post in evidenza

Edwardian skirt and blouse, circa 1900-1905

I've always been fascinated by the style of early Edwardian era, with those lightweight blouses, fabrics, delicate laces and floating s...